
FLOORING, WALLS, CEILING
STEP 8
PICKING YOUR FLOORING, WALLS, CEILING & DOOR MATERIAL
Flooring, walls and ceiling comes down to personal taste as there are many different looks and designs to choose from. Whether you want to have a white, bright feel or a more cozy, rustic vibe, this starts with your choices in these three areas. The biggest aspect of these areas is creating the “framing” for the van as this is what will make straight lines to work with and is an important structural part of your home. Things to consider when choosing your material are cost, size and weight.
COST: When shopping materials you’ll notice some are more expensive than others. Don’t worry because you can generally find what you’re looking for or something similar to what look you like in all price ranges. Be sure to have an idea of what your budget is before shopping this section as it can add up.
SIZE: When picking all three areas of materials it’s important to keep in mind the amount of room it will be taking. Remember every inch in your van is vitally important, especially if you’re tall. For example, Sunny is 6’2 so we had to factor in the exact amount of width the materials chosen would take up on the walls which affects our sleeping/feet room, to our ceiling & flooring, which affects walking and head room within the space. You have to be precise with these measurements if maximizing headroom is a priority.
WEIGHT: Think about how heavy the materials are that you’ll be installing and factor it in with the overall weight. Do research to find out how much your van can bare as your van’s lifespan can be affected by it’s weight.
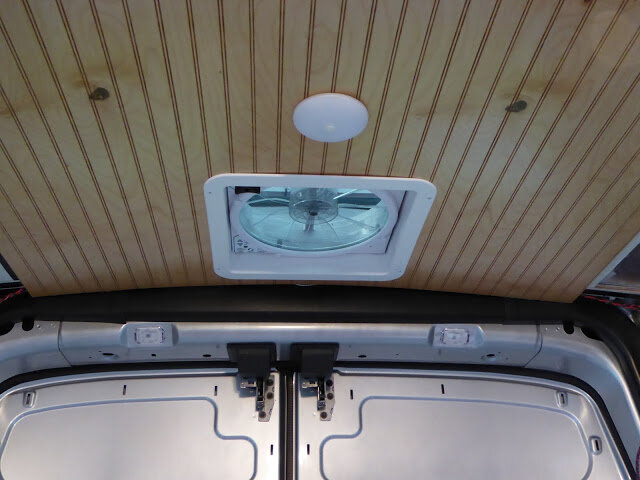
CEILING: Before installing your ceiling material be sure to install insulation and factor in electrical needs, for recess lighting or an ac/fan and be sure that there is a way to access the electrical wires. Make sure to not drill holes through your ceiling.
WALLS: Before putting up the wall material you must insulate and build a strong framed structure that creates straighter lines to add the material to. There are a few different ways to structure the framing. Also keep in mind the electricity and access to wires when needed.
DOORS: There will be areas on your sliding and rear doors where insulation and material is needed. The only thing regarding these areas is you’ll want to work with a material on the thinner side as people generally fill in the natural door cut outs which aren’t deep.
FLOORING: Before installing the pretty flooring you’ll need to install insulation and a subfloor. Most empty cargo vans do not come with flat floors. We installed polyiso rigid foam board in the divots of the floor followed by 1/2in plywood subfloor and screwing that in through the bottom of the van. You can watch our subfloor installation video here:

We’ve curated a list of commonly used camper van materials for walls, flooring and ceiling to help you get started.

FLOORING -
VINYL WRAP
Vinyl wrap is a cheap and easy installation as it’s essentially a big roll of sticky wrapping paper. Simply peel and lay down, it’s that easy! It also offers tons of fun patterns to choose from if you’d like to do something more unique and not have a wood-looking floor. The only main concern when using vinyl wrap is the longevity of withstanding everyday where and tear as well as if you can install it perfectly (without any bubbles or bumps). If your subfloor is not perfectly flat or smooth, you may notice those imperfections through the vinyl.

FLOORING -
VINYL CLICK & LOCK PLANKS
These high density planks are 100% waterproof and extremely thin so you don't have to worry about it cutting into your headroom. It’s simple to install, simply measure your space and cut pieces as needed with a box cutter. It’s designed with a locking system so you don’t need even need to use glue. It looks and feels like real wood. We highly recommend this type of flooring as it’s fairly affordable and extremely durable. This is what we used in our van and love it.

WALLS -
WEATHERED HARDWOOD
You can get a pack of Weathered Hardwood which gives off an authentic reclaimed barn wood appearance. Each piece is 1/2 in. x 4 in. x 4 ft. and the packs come in different colors and finishes. I like their, weathered white hardwood for a bright yet rustic appearance. Definitely something worth looking into if you’re going for a more weathered look. You could technically use this on the ceiling, bit I wouldn’t recommend to have a staggered finish for the ceiling.

WALLS OR CEILING - SHIPLAP OR TOUNGE & GROOVE PLANKS
We went with 1 inch thick, 6 inch wide and 8 feet long boards of pine shiplap. We love the long lines shiplap offers in small space as it gives an elongating effect to the eye. We also love the raw pine look but ended up painting the walls white and doing a clear sealant on the ceiling. However even if the sealant is clear it will change the light, raw color to a slightly darker, wooden tone. We went with shiplap because of the look, sturdiness and durability of the material. However it is on the expensive side and does add a lot of weight to the van.
If you can’t find shiplap you can also get tongue & groove wooden planks. Made out of cedar or pine, it’s similar to shiplap’s look, cost and size. Also very durable.
DOORS, WALLS OR CEILING -
BEADBOARD
Beadboard is a great option for your walls or ceiling as it’s budget friendly and flexible, making it easy to work with. It is not real wood, as it’s mostly MDF making it so that you won’t be able to sand or stain from the color purchased, however you can paint it. This material is thin at 3/16th’s of an inch and very lightweight. These features are perks when weight and headroom are priorities for you during your build but it’s not as durable as real shiplap or tongue and groove. We seriously considered using beadboard when making our decision as it’s already pieced together and comes in one large sheet making installation quicker. Whereas when using shiplap you will have to cut and install one piece at a time.

DOORS, WALLS OR CEILING - AROMATIC
CEDAR
We love aromatic cedar wood. It smells so good! We used this as all of our paneling on our doors because you can buy them in a pack and it’s thin and easy to work with. Remember you’ll want thinner material when working with the door cut outs. You can paint over it but that will cover up the amazing aroma. We wouldn’t recommend using this for the walls or ceiling as we feel the material is too fragile to withstand everyday wear and tear however it’s worked out wonderfully on all of our doors.

CEILING -
PLYWOOD + THIN PINE SLATS
If you’re on a tighter budget you can simply make your ceiling out of 1/4th inch plywood. It will work well with the curves of your van and you can paint it any color you’d like. For an extra touch of style you can add 1"x3"x10’ pine slats on top of the plywood and spaced out with gaps so to see the plywood between the slats. To create a look like this you simply paint the plywood black and add the slats on top after staining them your desired tone. The stain used in the photo is MINWAX, Interior Wood Stain - Dark Walnut.